Now after just watching Rogue One, I need to resist the urge to buy tons of X-wing miniatures and get back to painting up Genestealer Cult. Only three months to Adepticon!

Thursday, December 22, 2016
Adepticon Chat on Beasts of War
I just had the great opportunity to talk with Dawn from Beasts of War to chat about the 40k Friendly and 40k Team Tournament at Adepticon. Check it out!
Now after just watching Rogue One, I need to resist the urge to buy tons of X-wing miniatures and get back to painting up Genestealer Cult. Only three months to Adepticon!
Now after just watching Rogue One, I need to resist the urge to buy tons of X-wing miniatures and get back to painting up Genestealer Cult. Only three months to Adepticon!
Saturday, November 19, 2016
Genestealer Cult Tokens
I'm a total sucker for tokens. You can see what I've done for other armies before in the tags. I find that it helps so much in gameplay both in not forgetting things myself, but letting my opponent know what is going on. There is nothing worse then feeling like someone is pulling a fast one on you, or the reverse... completely forgetting important bonuses.
I created a set of tokens for the Genestealer Cult since there is so much going on. Here's a picture of the finished product!

To make it easy, here is the list of things you'll need. I left Amazon links for the product you'll need.
Q-Tip
1 Inch Round Glass Discs
1 inch circle punch
Mod Podge Glue
1 inch felt adhesive circles
Printed tokens

I created a sheet of tokens that are a little wider then 1 inch. That way you have some play in where you punch the circles. I then punched out all the circles.
Apply some mod podge glue to the back of the token and glued the face of the token to the bottom of the glass. After letting it dry, I simply added the felt circles to the bottom. Easy as that. Now I have nice looking tokens in a bin to break out in the games.

Hopefully tomorrow I'm going to get my first practice game in with the Genestealer Cult. There will be some proxy, but I hope to have a good chunk of actual models on the table.
Monday, November 14, 2016
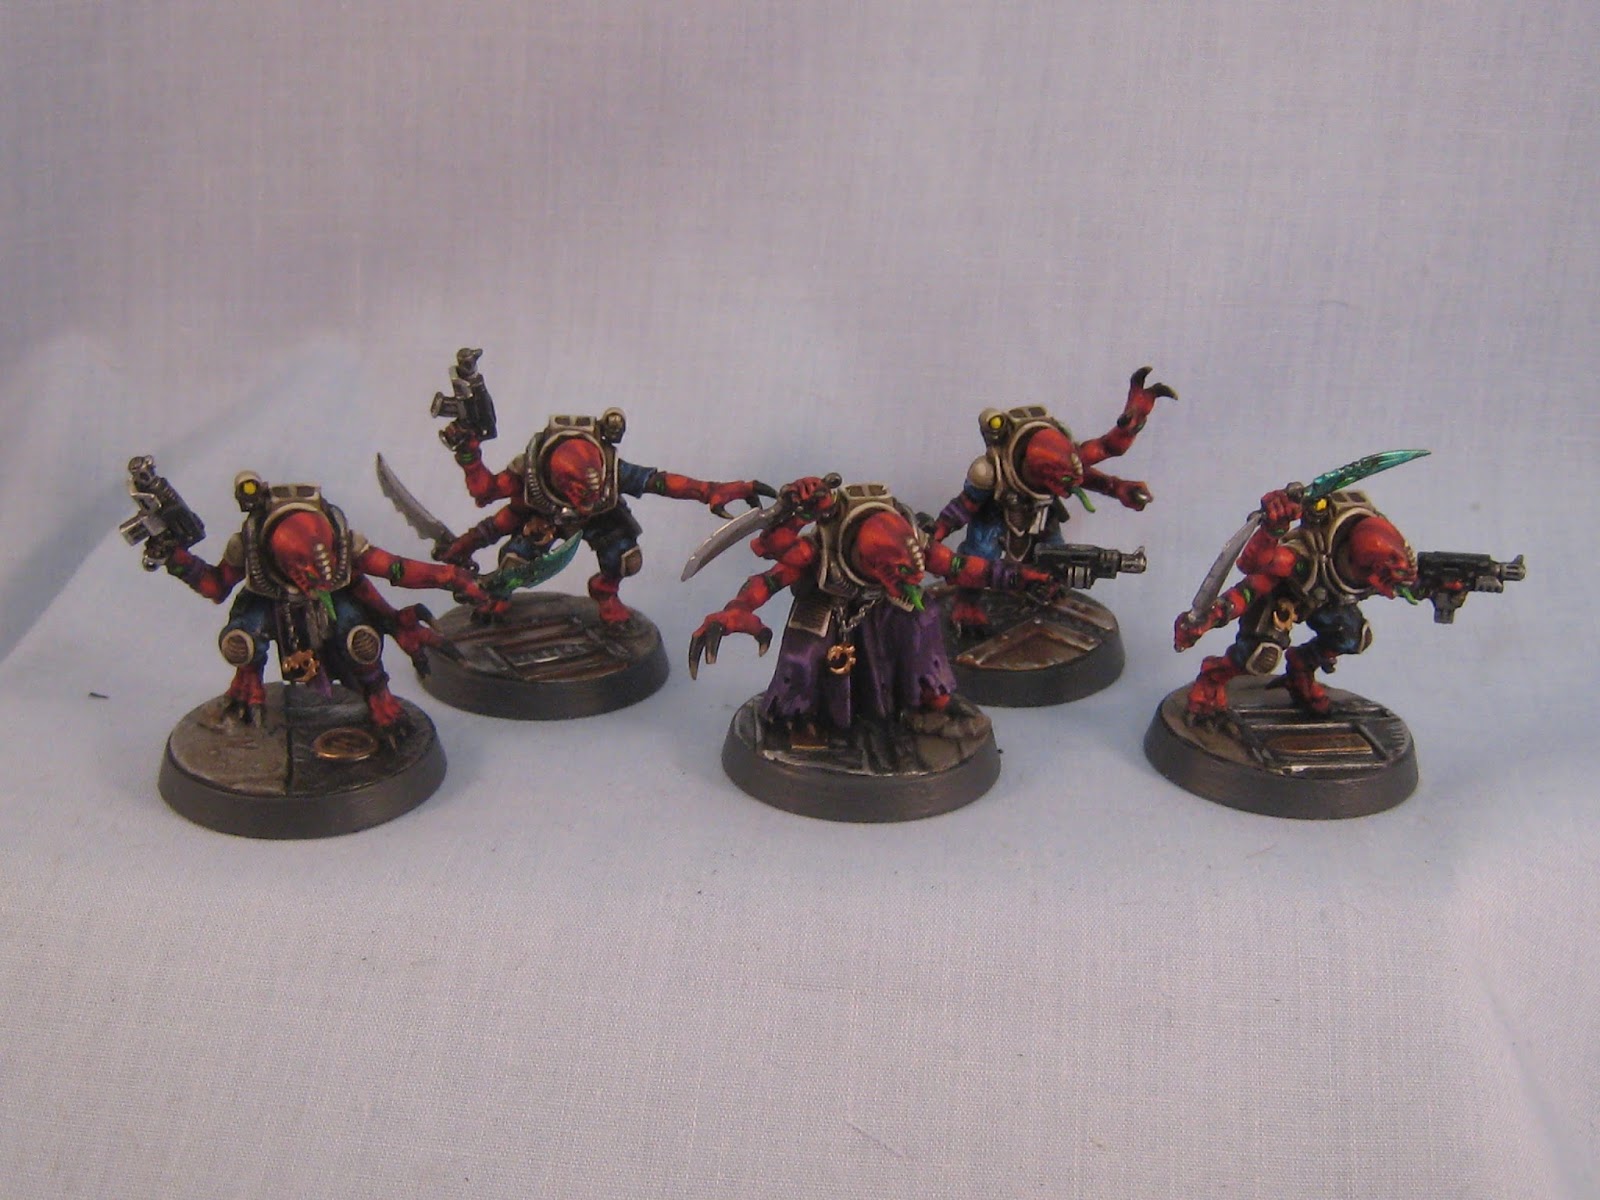
Genestealer Cult Test Models
I'm finally back to posting! I've been painting a bunch of Khorne models that I'll get up on the blog over the next few weeks but first I wanted to share my test models for the new army... the Genestealer Cult! I was so excited when Deathwatch Overkill came out. The models have so much character and the play style is so different than any other 40k army.
Many years ago we did a paint scheme with Tyranids. Red flesh tones and body with khaki carapace. As much as I love the traditional blues and purples I decided I'd incorporate the same old scheme to mesh the armies together.
Here are my first 5 acolytes from the deathwatch overkill box. It's quite a large paint pallet. I still need to dirty up and weather the bases. Looks like I needed to do a better job focusing with the camera, sorry about that!


Finally here are two additional genestealers I painted. They're painted under the same old scheme I did previously.


Next up on the painting table are the neophytes that look most like humans... then the hybrids that are somewhere in between. I'm also working on finally getting into 30k with Imperial Fists. Lots of hobby action!
Thursday, August 18, 2016
Under Construction!
Sorry all, it has been a long time since I've posted. My house has literally been under construction and it has kept me busy. That and a little laziness. I've done a bunch of hobbying on the side but haven't gotten to take any pictures

Here are the big projects I've been working on that I'll be sure to post some pictures on.
1. 40k Khorne Chaos: I did a bunch more units for adepticon, and was really happy with how they turned out. Photos to follow. On the workbench I'm finishing some daemon princes
2. Necrons: I've added a bunch to my regular playing list since it's so fast to paint. I finished off some lychguard, characters and a stalker. On the workbench I'm working on a destroyer cult.
3. Terrain: I've almost finished up my secret weapon minatures urban boards. On the workbench I'm doing some MDF street tiles that are more appropriate for Infinity and I'm tackling the secret weapon miniatures grassland and ruins tiles. Then on to infinity terrain!
4. Death Korps: All in the assembly phase... that'll big a big project!
5. Marines: Working on a bunch of pods, marines, and I think I'm going to paint up a few squads of Deathwatch
6. Tau: I really want to do the drone swarm of the piranha formation. This means tons of drones to paint as well as 10 piranhas. I'll need to figure out a fast way to paint this up. I'm also putting together that huge LOW suit.
7. Table: I'd like to do a nice looking gaming table frame that can hold all the tiles for a 4 x 4 table and can expand to a 4 x 6. I need to scan the internet for inspiration.
So yeah, a little hobby overload. I need to focus! The game "No Man's Sky" has been eating up some of my free time along with Warhammer Total War. Just need to wrap up all my Honey-Do lists...
Tuesday, May 31, 2016
Tablescapes: Urban Street Painting #3
I've been slowly adding and trying new things to the tablescapes urban tables. It's been fun (and frightening) trying out new skills but I'm learning a ton of new hobby skills.
I washed all the metal areas with a brown/black ink wash and went about sponging on masking fluid everywhere I wanted to put down road markings. I then created some masking tape stencils to airbrush on the patterns.

I also went out and bought some random patterns to put on the open spaces and figured some hazard stripes might look cool as well. These were all airbrushed on as well. Not too bad for my first try and it. The masking fluid rubbed off easily with a large eraser and I was good to go.
To celebrate the holiday weekend, I had a friend of mine and his son over to try out Infinity. Unfortunately these roads are way too wide for Infinity (my fear) but I'll see if I can come up with some road debris to add line of sight blockers. It was fun, and it was great to play outside with beer.

I then finished up last night by doing an oil wash of a dark brown. I slathered it on and used a paper towel to pull off the top. I wanted to "dirty" up the concrete flat tiles some. After that was finished I let it try for the evening and did a matte coat of spray to seal it in. It's hard to see my yellow lane dividers up top, but you can see the finished product on them as well.


Next steps will be doing the same wash to the street and intersection tiles and then I'll try my hand at weathering powders. It's been a very fun project, and I'll have enough to manage about 3 4'x6' tables for friends to come over.
Thursday, May 12, 2016
Tablescapes: Urban Street Painting 2
I've been slacking on my painting. Work and life have gotten in the way. Here are some more progress shots of the tablescape urban tiles.
I first started by airbrushing in the Badger Airbrush "Cracked Soil. I did it around all the drains, manhole covers, and craters.


I then worked into the craters some darker brown. I used the Badger Muddy Brown to do that. Finally I pulled in the black color in the center of the craters and I covered all of the metal work.


Next step is to paint all the metal work silver then wash it with an armor wash. I'll then be on to the stuff I don't have any experience on... masking fluid to break up the yellow painted street markings! After that I'll work on oil washes and weathering powders.
Thursday, April 21, 2016
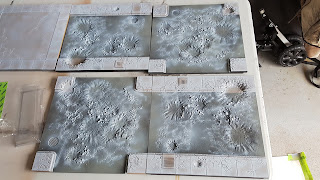
Tablescapes: Urban Streets Tile Painting 1
I admit, I'm super scared of my airbrush. I think the older I get the more I realize there is a learning curve on new skills and question whether it's worth diving into it. Sad, huh? But I decided what is a better way to learn airbrushing then some relatively flat tiles. Maybe if I get the hang of that I can start trying out miniatures.
I figured I also am super scared of doing weathering powders and oils... so why not jump full on and try all these new skills! I'd love to apply it to vehicles and terrain.
I picked up a ton of the Secret Weapon miniatures tiles. I have enough of the clean and damaged urban streets to probably do 12 or 16 feet of gaming tables. I originally thought I could use them for Infinity but the roads are a little too wide. Now that I'm on a Death Korps kick, I thought it would be cool to do them in an urban setting as they're trudging through a bombed out city. I'm also tempted to do a genestealer cult and Deathwatch pairing duking it out in an urban setting.
With that said, I dove in now that the weather is nice. I primed all of the bases black then started with my first couple of spray paint coats. I first started with Rustoleum Self Etching Primer. It's an awesome greyish color with a hint of green. The picture outside makes it out to be way lighter then it is, but you get the idea. I hit all the roads with that in an uneven pattern.

I then masked off all of the roads and hit the sidewalks and concrete areas in a base of the Rustoleum Nutmeg. It'll give me a brownish undercoat that I can layer on the grey.


I kept with uneven coats through that, letting some areas of the black undercoat show through. Here's most of my stack of the tiles I'll now begin airbrushing. I started last night and after a ton of mistakes and learning, I finally got the hang of it.

I worked in the Minitaire Concrete Slab into the sidewalks and then added it into the highlighted areas in the streets after I pulled off the masking. Funny enough the first picture was with the garage door closed at night, and the other two were from this morning. Lighting makes a difference.


I ended up finishing about half the tiles, and got really fast towards the end. Next steps I'm going to work in more earth tones, and figure out if I paint the striping on the streets or do the blast marks next. Then on to the scary oils, washes, and weathering!
Wednesday, April 13, 2016
Death Korps of Krieg - Next Big Project
I think I've solidified it that I'm going to go Death Korps of Krieg as my next big project. I've had the models since they first came out and I absolutely love the sculpts. I think I'll go a pretty traditional greys on the uniforms with khaki color pants.

For basing, I'm thinking of doing some sort of burnt out city. Demolished urban setting. I think it would be pretty sweet to make cool themed terrain for them to walk over.
The biggest challenge I have is how to do weathered and battle damaged tanks. I've never worked with weathering powders and my tanks always look pristine. It's intimidating. I could use any recommendations on books, or tutorials that are out there. I want to spend the extra time to make the product really pop.
My first list is going to be modeled after the Krieg Assault Brigade. It'll get me the chance to paint up a bunch of infantry and some small artillery pieces like mortars and thud guns. Also a mix of a few tanks. I'll tackle a cavalry and heavy artillery list in the 2nd wave.
Any thoughts or help on weathering & battle damage would be great!
Friday, April 8, 2016
Adepticon Recap
Adepticon has come and gone and I'm in detox mode! Making things up to the wife for being away so much and cleaning up the wake of my mad hobby cramming. It was a blast. I wish I had the chance to practice with my army, but in the end I had a great time.
Started off with the 40k champs. I got smoked and got very minimal battle points, but it seemed like whenever I needed the game to go on, it didn't and whenever I needed it to end it kept going! I won't use those as excuses, had 3 out of 4 games were a ton of fun.

I didn't expect it, but my army ended up placing 2nd for appearance points. For something I finished up late the night before (and had to take some shortcuts), I was really happy with the results. I'm thinking I should keep on the chaos kick and paint the miniatures I wasn't able to get to. Might as well while I'm still into the army even though I'm a bit burnt out.
Friday was the 40k Friendly. Jeff and I did the Blues Battle Brothers as a theme this year and everyone seemed to have a good time. Unfortunately we were a little short staffed so I was stuck behind the computer most of the tournament. Next year we'll rectify that... and we're very close to having a theme for 2017.

Then the team tournament. The display board turned out great, and didn't get damaged as we assembled it on site. Whether or not it's OK now is another story, as I have yet to reassemble it as parts are in my garage awaiting it's permanent stay in my basement.
We did pretty average on the games, I won big or lost big and ended up getting three max scores and two zeroes for battle points. One of the losses we were in it to the end, it was close to being a tie had I played a little bit smarter.
Here's some pictures from my camera on how the base turned out, I wish I would have taken better shots. The lighting didn't seem to come through.


We were so trying for best heretical team. As the awards ceremony went on, we were bummed we missed that and best display... when we got totally surprised and our team won best theme. It's the ultimate for us, and everyone's hard work paid off.
Over the next few days I'll post more of the miniatures I painted up over the week. I think I've decided on my next few 40k projects.
- Add some necrons for a few fun builds
- Work on a marine gladius list, flush out my marines
- Finally tackle the death korps of krieg. I've had these miniatures ever since they came out. I've been dying to get some paint on them. It might even be my big project for Adepticon next year.
Now on to cleaning the house!
Started off with the 40k champs. I got smoked and got very minimal battle points, but it seemed like whenever I needed the game to go on, it didn't and whenever I needed it to end it kept going! I won't use those as excuses, had 3 out of 4 games were a ton of fun.

I didn't expect it, but my army ended up placing 2nd for appearance points. For something I finished up late the night before (and had to take some shortcuts), I was really happy with the results. I'm thinking I should keep on the chaos kick and paint the miniatures I wasn't able to get to. Might as well while I'm still into the army even though I'm a bit burnt out.
Friday was the 40k Friendly. Jeff and I did the Blues Battle Brothers as a theme this year and everyone seemed to have a good time. Unfortunately we were a little short staffed so I was stuck behind the computer most of the tournament. Next year we'll rectify that... and we're very close to having a theme for 2017.

Then the team tournament. The display board turned out great, and didn't get damaged as we assembled it on site. Whether or not it's OK now is another story, as I have yet to reassemble it as parts are in my garage awaiting it's permanent stay in my basement.
We did pretty average on the games, I won big or lost big and ended up getting three max scores and two zeroes for battle points. One of the losses we were in it to the end, it was close to being a tie had I played a little bit smarter.
Here's some pictures from my camera on how the base turned out, I wish I would have taken better shots. The lighting didn't seem to come through.


Over the next few days I'll post more of the miniatures I painted up over the week. I think I've decided on my next few 40k projects.
- Add some necrons for a few fun builds
- Work on a marine gladius list, flush out my marines
- Finally tackle the death korps of krieg. I've had these miniatures ever since they came out. I've been dying to get some paint on them. It might even be my big project for Adepticon next year.
Now on to cleaning the house!
Tuesday, March 29, 2016
Chaos Display Boards - Painting
I'm so scrambling to get things done before Adepticon. I have about 60 figures that are 95% done. As soon as I add the finishing touches I'll post some unit pictures.
In between painting my wife helped me a bit more on the two display boards I'll use throughout the year and the Adepticon Championship. After carving, I put a layer of latex paint down to help seal the boards. Then did a few layers of greys to get a base down and some browns around the sand.
We then started with painting random individual stones slightly lighter or darker colors. Thanks again to my wife with the help on this!


I then put a few layers of a gloss coat on to assist with some oil washing. I prepared a stinky batch of black/brown oil wash to line the cracks of the stone and darken some of the stones and sand.


To add some random elements of terrain I created some more brazier "fires" and picked up a couple of fish tank aquarium decorations and painted them. The Mayan looking one will eventually have simulated fire coming out the sides that are open. The big mouth sculpture will go over the blood river on the back of the base.

I then sealed them with a matte coat to lock in the oils and taped off the top so I could apply a spray lacquer to the frame. All of these coats and sprays spanned about a week of work between dry times. The fun part was next. Blood splatters in random places and I filled the river with the first coat of the blood. I also did some green/brown water for the areas on the side.


I need to wait until things are completely dry before I put the static grass on, that will probably be the night before the tournament. There they are! I'll get some completed pictures done at the tournament. I'm still debating on whether I go with the large or smaller base. We'll have to see how the miniatures fit. It'll be a long couple of late nights as I try to get as many painted as possible.
Subscribe to:
Posts (Atom)