Monday, July 25, 2011

The Flood: Hobby on Hold

Well, this weekend didn't go as planned.  "Acts of God" tend not too.  Chicago got a record amount of rain for a short period of time.  Just east of my house got over 7 inches in a matter of a couple of hours.  Well, all my backup pumps and generator couldn't do squat with the storm drains not having any room.  Hence a major flood in my basement.

should be my theme next year
I spent the weekend tearing up everything and more work to come.  At least things are dry.  Unfortunately among other things, this means my hobby is on hold as all my free time is going into remodeling the basement. 

Between now and the end of August, I do need to prep for Nova.  I will get my two tanks, infantry models and a few test games.  Really sucks that I won't get to put more time in.  Lucky for me my travel schedule should be pretty light for August for work.  I only have a day trip to Toronto on Wednesday for this week.

Stay tuned to an eventual hobby update!

Tuesday, July 19, 2011

Nova: Imperial Suns Progress (1)

I had a great extended weekend in Northern Wisconsin... no internet or phone access. It was really nice to get away.  Being a smart (and with a very understanding wife) hobbyist I brought up miniatures to paint.  Even though I forgot a lamp, I was able to paint during the daylight hours. 

For Nova at the end of August, I'm bringing my Imperial Suns space marines.  No major tricks, just a balanced list (maybe a little light on troops). Here's an example on what some of the army looks like.


I have yet to paint a predator, vindicator and 5 scouts.  That and finish up the display board, make some destroyed vehicle craters and smoke, and all the little extra stuff like pretty army lists.

Here's where I got over the weekend.  I put my first level shading on the vehicles and my first level highlight on the blues and yellows.  I won't go any further with the yellows until I'm done with the blue.  I find that the leftover paint on my sloppy fingers turns the yellow green.  I'll work on the symbols later too. The scouts have the base yellow and blue down with shading.  Now to build up the colors there.  Not bad for lacking my usual light source!


I'd like to do some fancy designs on the front of the vindicator.  The siege shield is begging for some freehand work.  Right now all I can think of is just an ornate sun.  Any suggestions?

I'm off to Vancouver tomorrow, so no painting until the weekend.  I'll try and get a good dent in my vehicle painting and finish up the display board.

Tuesday, July 12, 2011

Painting Pirates (1)

While my display board for Nova is drying, I figured I'd switch gears and work on some pirates.  I assembled 5 of the dwarf slayer pirates, the ogre pirate and the collector's edition pirate.  This army will be more of a "speed painting" army so I have time to work on the extras.  Plus I have a feeling the dark eldar will take a ton of my time for the remainder of the year.  Here's some in-progress shots of the pirates.  I'm just laying down base colors in preparation for a heavy wash of black & brown wash.


The big pirate ogre will be a unit filler in my handgunner squads.  In my 1k list for Adepticon Fantasy Team Tournament, I plan on basically only running:

- 3 units of 10 handgunners
- 10 huntsmen (skirmishing pirates!)
- 3 cannons
- 2 rocket batteries
- Engineer

My teammate will be running a similar list only mortars instead of rockets and a wizard instead of an engineer.  We'll get our butts kicked, but it'll be a wacky fun list.  The idea is maximum gunpowder!

Here are some work in progress on assembly.  I will be using one of the leadbelchers as a stand in for a cannon, and I need to sculpt on pirate hats for most of the unit (and ogre).


I'm flying out to Minnesota tomorrow, and on a little vacation Saturday through Tuesday, followed up by an immediate trip to Vancouver!  This means not a whole lot of painting time before Nova.  I might sneak some tanks on my trip over the weekend and get some relaxing painting in.

Tuesday, July 5, 2011

Creating a Portable Display Base: Painting (2)

This display board has been flying by.  It's relaxing to do some easy speed painting and not have to worry about fine details.  I'll be quickly back to those once I get working on the rest of my Imperial Suns for Nova.  At this point my display board is done being painted.  I'll just need to flock and add snow once the water effects are completely dry in a week.  Here's how I worked through the statue and battlements.


I'll lump the picture progression together.  Here's the steps I did. 

Barricades:
- Base in Charadon Granite
- Dry brush Codex Grey
- Paint eagle and electronic bits in the back with Chainmail
- Wash with 50/50 black and brown wash.

Statues:
- Base in Tin Bitz
- Dry brush Dwarf Bronze
- Light dry brush Burnished Gold
- Light dry brush Mithril Silver
- Healthy watered down wash of Jade Green (yes I still have some).
- Stone base with the same colors I did the display board; pewter dry brushed with white mixture.
- Black washed the stone for a little definition.


I'm happy with how fast and easy they were and I think they turned out great.  Here's what I'm working on next.  Assembled 5 scouts with shotguns, a predator and a vindicator.  This combined with fixing a terminator and tech marine and I'll be ready for Nova!


The illustrious priming box
Now the trick will be to get a bunch of practice games in from now until the end of August!

Monday, July 4, 2011

Creating a Portable Display Base: Painting (1)

Painting is such an easy and fun part of the display base construction.  My advice is two keep the materials cheap.  Craft paint from the local craft store is perfectly fine for what you're doing as well as cheap spray paint.  I started by painting on any of the exposed foam portions with black paint.  Spray paint has a tendency to "melt" foam so I don't want to take any chances. 


Once that had the chance to dry, I brought the base outside for spray painting.  I first went with a cheap flat black primer and hit the base.  For the trim, I decided to go with a high gloss lacquer.  This will hold up better to handling and creates some contrast (similar to the black rim of a miniature base).  I hit that from multiple angles to make sure it coated within the decorative trim.


Everything I painted at this point onward was done with a 1" brush.  When dry brushing it's best to go with a circular motion.  This will blend better. Also it's even better if it's not uniform; go darker in some places, lighter in others.  In the end I'll be using static grass and snow patches so that will help break things up as well.  I first started with a pewter colored grey.  I brushed this on to all the rock and cobblestones.


I then went with a medium brown (similar to calthan brown).  A heavy dry brush was applied to all dirt areas and I even stippled some on to the cobblestone and blended into portions of the rock.  I didn't wash my brush between colors so it helps blend some of the colors together.  I think it makes things a bit more natural. 


My next dry brush stage was a color similar to graveyard earth.  I drybrushd across the dirt, heavier in certain patches.


I then started adding white mixed in with the pewter color and dry brushed it across all of the stone as well as a few patches in the dirt. 


My next color for the dirt was similar to a kommando khaki.  This went across the dirt and patches of the stone.  I must have forgotten to take a picture of just this stage, but next I went with an almost pure white in patches.  These are the areas that will have more of the snow mixture and again it breaks up the dirt texture. 


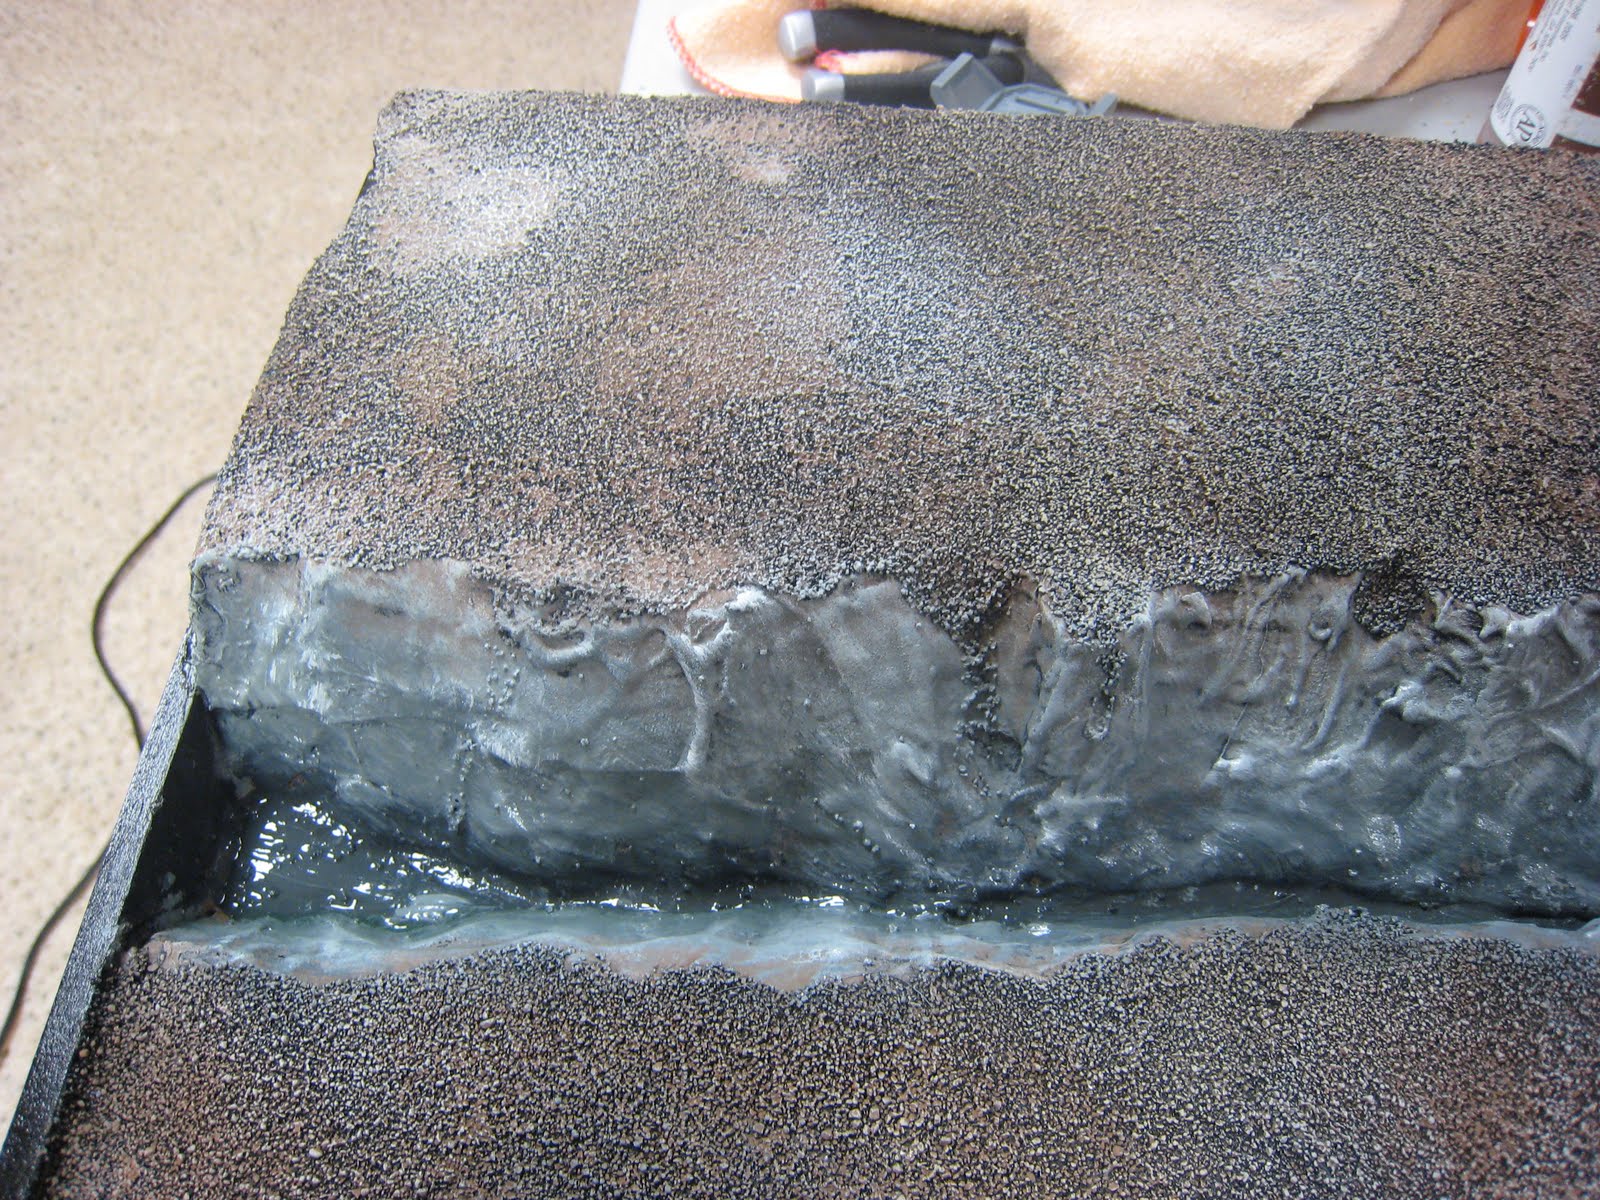
Now comes the tricky part.  For the river itself I want to paint the base of it and blend it into the rock color.  I did a mixture of black and dark green and blended it up into the base of the rock.  I then proceeded to work some of the pewter grey back into the base and went back and dry brushed in some grey/white.  I guess this stage is a bit like the cooking shows where they wing it and add a bit of seasoning or wine to taste. 

Once it dried I started with my first pour of water effects.  Be sure to go with thin coats.  Unfortunately this is an extremely long dry time; at least 24 hours between coats.  Make sure that you give yourself adequate time before you need to use the base, this is not something to be done the night before the tournament!


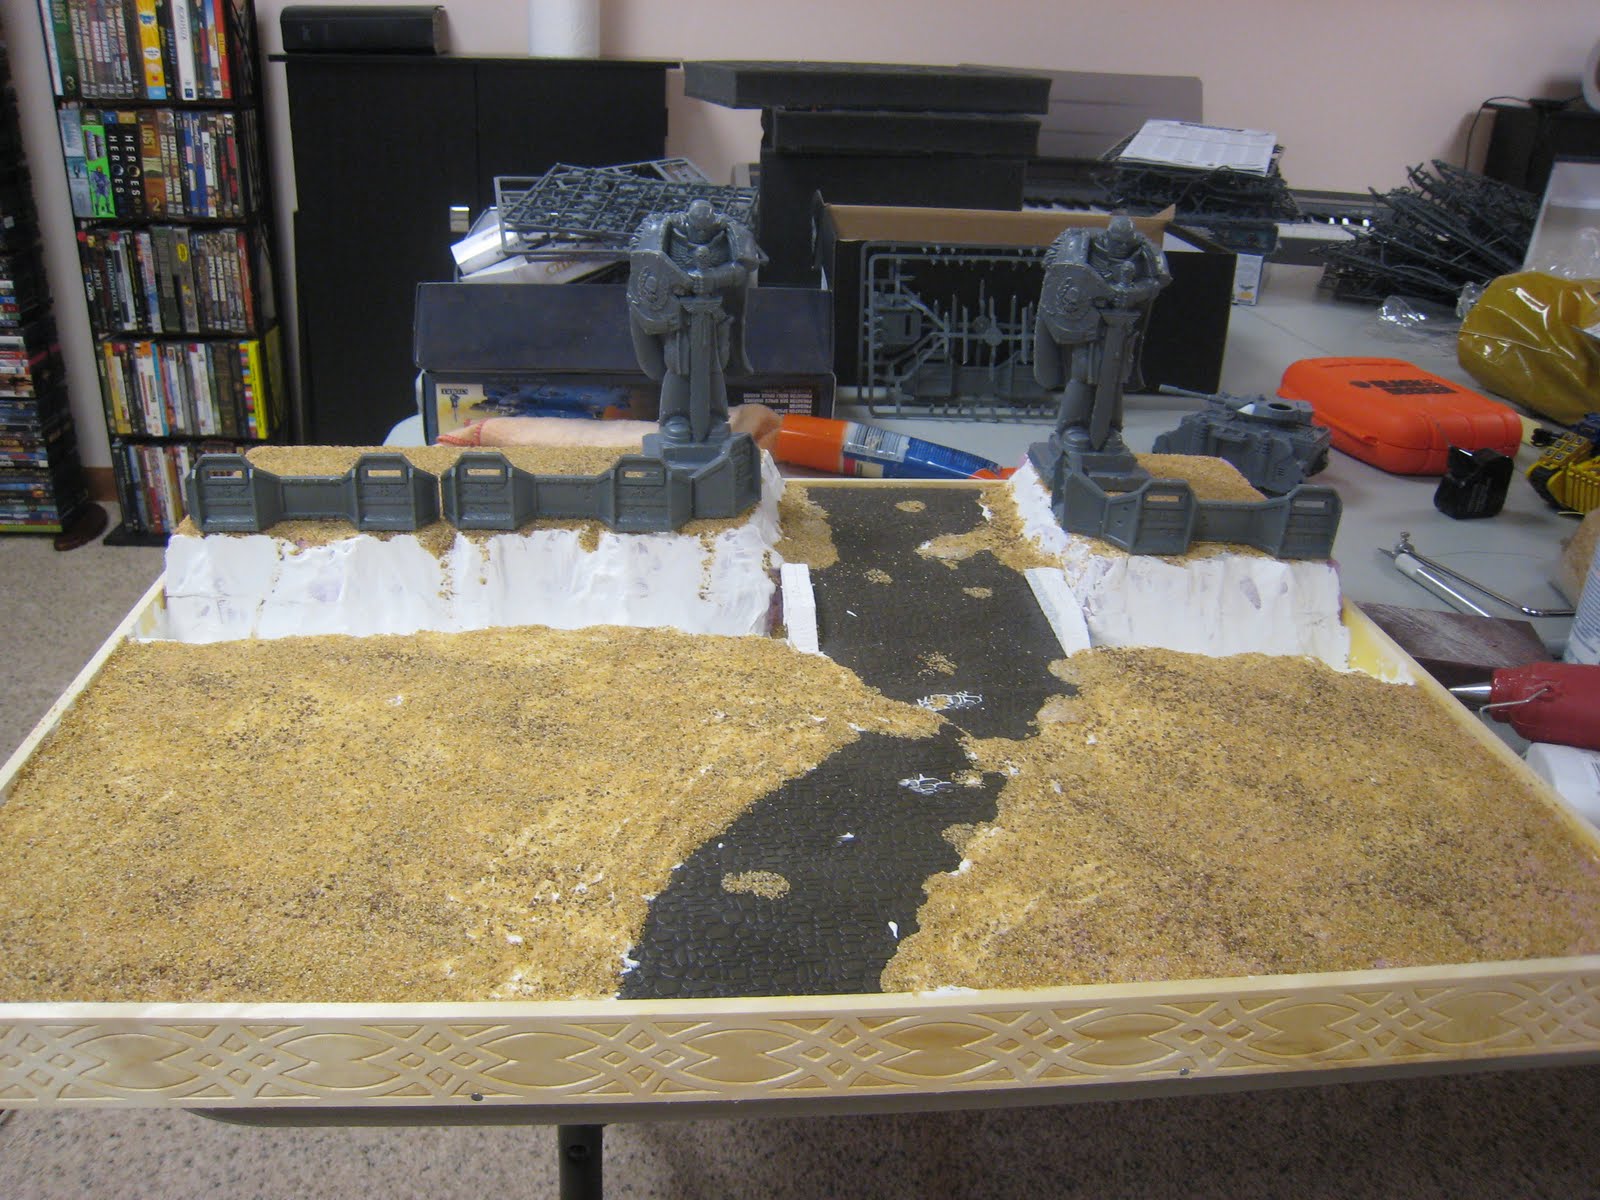
I'll probably go with three coats of water effects done every two days.  Here's my finished product so far.  I'll wait until the very end before I add the static grass and snow. 


It's an absolutely beautiful day outside today, so while my wife is shopping I'm going to bring my pallet outside and work on some painting on the deck.  I'll work on the statues and barricades.  I'm going to do some research on statues.  If my memory serves me correct, Dave Taylor did some great looking statues for his greatsword unit.  I'll look to his recipe. 

Sunday, July 3, 2011

Creating a Portable Display Base: Construction (2)

At this stage I'm about to enter the messy part of the construction.  There is no way to keep clean with spackle and glue.  I act like a 4 year old when I'm working through these parts and smear it around with my fingers.  Since I want to keep the traveling base a little extra protected, I bought some decorative wooden trim.  After cutting it to size, I put a healthy dose of wood glue and lined it up to a side.  Since I don't want the wood to split I drilled a pilot hole then tacked the board in place with finishing nails. 


After that I then put the other sides of the boards on and tacked them together.  Again since these boards are so thin ad I don't want to split them, I've drilled pilot holes.


Because I really want this thing to be permanently together I took out my trusty hot glue gun and filled the gap between some of the foam and board.  This is now one solid board!


Now I need to cut out where my simple bridge goes.  I lined up the pieces and cut around it.  I don't need to cut out the inside since it will provide extra support for the cobblestone pattern.  Once it's in place, I hot glued it down.


Since I want to use up some of my remnants of leftover cobblestone, I had to do the bridge in two pieces.  I didn't want a hard line separating them (would be extra obvious where the two sheets met so I cut some different angles.   Unfortunately I made them a little too small, so now the creation of the road takes a creative turn.  I'll now make it in disrepair and cover patches with dirt as if it's slowly being taken back to nature.  As usual, a liberal dose of hot glue locks it in place.


Since I want to make the hills look more like one piece and less like I cut them with a foam cutter, the next step involves a lot of spackle.  I use it not only to cover the hill facing, but to cover up some of the gaps between the foam and board.  I also use it to cover over parts of the bridge.  I call this the 4 year old stage since I'm absolutely covered in spackle by the time I'm done. 


This stage requires at least 12 hours to dry, so I put the project down for the evening.  The next day I sand down any spackle that overlapped the trim and start spreading down patches of glue and applying the hobby sand.  Again, lots of mess involved.


After a few hours I know it's dry so I shake off the excess sand and I'm ready to go to the next stage of painting.  Here's the board on where it stands now. 


I'll hopefully get some painting in this weekend.  As usual, I'm traveling for work this week - this time out to Seattle.

Saturday, July 2, 2011

Creating a Portable Display Base: Construction (1)

Keeping with the light weight goal, my material for constructing the base will be pink foam.  Since I went with only a 1/4" board, the foam also acts to strengthen the board.  For these steps I grabbed a sanding block, hot wire foam cutter, a razor blade and my trusty hot glue gun. 


I first started out by cutting the front block of pink foam.  When doing this I cut it a little larger then the ultimate size, since I'll be trimming it up in the later stages.  After it was cut to size I took the hot wire cutter and started creating the river banks.


I then took the other side of the foam and repeated the process.  This stage can be sloppy, I'll go through with spackle later in the construction to fill in the gaps and create the rock textures.


Since I want the back portion a level higher, I cut two pieces of foam and used the hot wire cutter to match the piece below. 


At this point I put all the pieces in place and trimmed up the foam.  I proceeded to get the hot glue gun nice and hot and glued the pieces in place on the board. Make sure you apply enough pressure to keep the two parts together while the glue dries and sets. 


Since I left a gap around the outside of the board, I took my hot wire cutter and cut along the outside of the base to be flush with the wood board. 


I then took a sanding block and went around the edge to smooth it down and create a more flush connection of foam and board.  

Before Sanding
After Sanding
When working with foam, it will usually lift up a bit on the edge.  I also want to create a really tight bond and not have any gaps.  Here's a trick to use with the hot glue gun.  You'll notice that the gap is apparent between the foam and the board.


I first start by applying a bead of glue across the gap.  I then take the hot side of the glue gun and slide it across the glue bead flattening it out and sealing the gap.  I repeat this step around the entire outside of the board.  At this point you can then paint it and it will hold up for a long time. 


I've decided for this board I'm going to take it a step further and add wood trim around the outside.  This will be the first time I go this route, honestly you won't have any problems if you use the hot glue trim trick.  At this point I wanted to double-check and make sure my board will fit in the suitcase, and luckily I was correct!  Plenty of space in there.


My next stage of the construction will be working on the bridge section as well as placing the cobblestone, surfacing the cliff face and adding texture to the board.
Related Posts Plugin for WordPress, Blogger...